最近几年来,地理信息系统无论是在理论上还是应用上都处在一个飞速发展的阶段。 GIS被应用于多个领域的建模和决策支持,如城市管理、区划、环境整治等等,地理信息成为信息时代重要的组成部分之一; “数字地球”概念的提出,更进一步推动了作为其技术支撑的GIS的发展。 与此同时,一些学者致力于相关的理论研究,如空间感知、空间数据误差、空间关系的形式化等等。 这恰好说明了地理信息系统作为应用技术和学科的两个方面,并且这两个方面构成了相互促进的发展过程。
Broadcast receivers are used to respond to broadcast messages from other applications or systems. These messages are sometimes called events or intentions. For example, an application can initialize a broadcast to let other applications know that some data has been downloaded to the device and can be used by them. In this way, the broadcast receiver can define the appropriate actions to intercept these communications.
There are two important steps to make the broadcast intention of the system work with the broadcast receiver.
Create a broadcast receiver
Register a broadcast receiver
As an additional step, to achieve custom intentions, you must create and broadcast them. The broadcast receiver needs to be implemented as The application passes through the Now, whenever the Android device is activated, it will be broadcast by the receiver There are many system-generated events that are defined as classes Event constant Description android.intent.action.BATTERY_CHANGED A persistent broadcast that contains battery charging status, level and other information. android.intent.action.BATTERY_LOW Identifies the low power condition of the device. android.intent.action.BATTERY_OKAY Indicates that the battery is ready now after the battery is low. android.intent.action.BOOT_COMPLETED Broadcast once after the system has finished booting. android.intent.action.BUG_REPORT Displays the activity for reporting bug. android.intent.action.CALL Someone who performs the call data assignment. android.intent.action.CALL_BUTTON The user clicks the “call” button to open the dialer or other appropriate dialing interface. android.intent.action.DATE_CHANGED The date has changed. android.intent.action.REBOOT The device restarts. If you want to generate and send custom intentions in your application, you need to pass the This example explains how to create a broadcast receiver to intercept custom intentions. Once you are familiar with custom intentions, you can program for the application to intercept the intentions generated by the system. Let’s follow the steps below to modify the Android application we created in the Hello World instance section. Steps Description 1 Use Android Studio to create the Android application and name it broadcastreceiver, and put it under the com.runoob.broadcastreceiver package in the Hello World instance chapter. 2 Modify the main active file MainActivity.java to add the broadcastIntent () method. 3 在com.runoob.broadcastreceiver包下创建名为MyReceiver.java的新的Java文件来定义广播接收器。 4 应用程序可以处理一个或多个自定义或者系统的意图,没有任何限制。每个你想拦截的意图都需要使用 5 修改res/layout/activity_main.xml文件中的默认内容来包含一个广播意图的按钮。 6 There is no need to modify the string file, Android Studio will pay attention to the string.xml file. 7 Start the Android emulator to run the application and verify the results of the application’s changes. The following is the contents of the modified main active file src/com.runoob.broadcastreceiver/MainActivity.java. This file contains each basic lifecycle method. We added the broadcastIntent () method to broadcast custom events. 下面是src/com.runoob.broadcastreceiver/MyReceiver.java的内容: Next, modify The following is The following is Let’s run the Hello World we just modified! Applications. I assume that you have created AVD when you installed the environment. Open the active file in your project and click the icon in the toolbar to run the application in Android Studio. Android Studio installs the application on AVD and starts it. If all goes well, it will be displayed on the simulator window as follows: Now click the “broadcast intention” button to broadcast our custom intention. This will broadcast our custom intent “cn.programmer.CUSTOM_INTENT” in our registered broadcast receiver You can try to implement other broadcast receivers to intercept the intentions generated by the system, such as system startup, date change, and low power. 3.12.1. Create a broadcast receiver 
BroadcastReceiver Class and overrides the onReceive() Method to receive a Intent A message whose object is a parameter.public class MyReceiver extends BroadcastReceiver { @Override public void onReceive(Context context, Intent intent) { Toast.makeText(context, "Intent Detected.", Toast.LENGTH_LONG).show(); } }
3.12.2. Register a broadcast receiver 
AndroidManifest.xml Register a broadcast receiver in to listen for established broadcast intentions. Suppose we are going to register MyReceiver to listen for what the system generates ACTION_BOOT_COMPLETED Events. This event is issued when the startup process of the Android system is complete.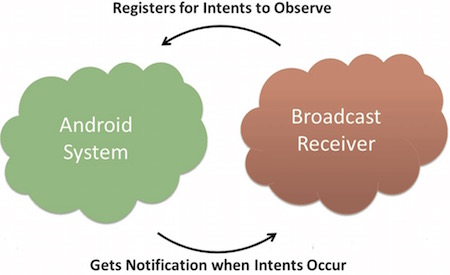
<application android:icon="@drawable/ic_launcher" android:label="@string/app_name" android:theme="@style/AppTheme" > <receiver android:name="MyReceiver"> <intent-filter> <action android:name="android.intent.action.BOOT_COMPLETED"> action> intent-filter> receiver> application>
MyReceiver Intercepted, and in the onReceive() The logic implemented in the. Intent The static constant value in the. The following table lists important system events.
3.12.3. Broadcast custom intent 
sendBroadcast() To create and send these intentions. If you use the sendStickyBroadcast(Intent) Method, the intention is sticky, which means that the intention you send is maintained after the broadcast is completed. public void broadcastIntent(View view) { Intent intent = new Intent(); intent.setAction("com.runoob.CUSTOM_INTENT"); sendBroadcast(intent); }
com.runoob.CUSTOM_INTENT The intention can be registered like the intention generated by our registration system before. <application android:icon="@drawable/ic_launcher" android:label="@string/app_name" android:theme="@style/AppTheme" > <receiver android:name="MyReceiver"> <intent-filter> <action android:name="com.runoob.CUSTOM_INTENT"> action> intent-filter> receiver> application>
3.12.4. Example 
package com.runoob.broadcastreceiver; import android.os.Bundle; import android.app.Activity; import android.view.Menu; import android.content.Intent; import android.view.View; public class MainActivity extends Activity { @Override public void onCreate(Bundle savedInstanceState) { super.onCreate(savedInstanceState); setContentView(R.layout.activity_main); } @Override public boolean onCreateOptionsMenu(Menu menu) { getMenuInflater().inflate(R.menu.menu_main, menu); return true; } // 广播自定义意图 public void broadcastIntent(View view){ Intent intent = new Intent(); intent.setAction("cn.programmer.CUSTOM_INTENT"); sendBroadcast(intent); } }
package com.runoob.broadcastreceiver; import android.content.BroadcastReceiver; import android.content.Context; import android.content.Intent; import android.widget.Toast; public class MyReceiver extends BroadcastReceiver { @Override public void onReceive(Context context, Intent intent) { Toast.makeText(context, "检测到意图。", Toast.LENGTH_LONG).show(); } }
AndroidManifest.xml Files. Here by adding
res/layout/activity_main.xml The contents of the file that contains buttons to broadcast custom intentions. <RelativeLayout xmlns:android="http://schemas.android.com/apk/res/android" xmlns:tools="http://schemas.android.com/tools" android:layout_width="match_parent" android:layout_height="match_parent" android:paddingLeft="@dimen/activity_horizontal_margin" android:paddingRight="@dimen/activity_horizontal_margin" android:paddingTop="@dimen/activity_vertical_margin" android:paddingBottom="@dimen/activity_vertical_margin" tools:context=".MainActivity"> <TextView android:id="@+id/textView1" android:layout_width="wrap_content" android:layout_height="wrap_content" android:text="广播实例" android:layout_alignParentTop="true" android:layout_centerHorizontal="true" android:textSize="30dp" /> <TextView android:id="@+id/textView2" android:layout_width="wrap_content" android:layout_height="wrap_content" android:text="www.runoob.com" android:textColor="#ff87ff09" android:textSize="30dp" android:layout_above="@+id/imageButton" android:layout_centerHorizontal="true" android:layout_marginBottom="40dp" /> <ImageButton android:layout_width="wrap_content" android:layout_height="wrap_content" android:id="@+id/imageButton" android:src="@drawable/ic_launcher" android:layout_centerVertical="true" android:layout_centerHorizontal="true" /> <Button android:layout_width="wrap_content" android:layout_height="wrap_content" android:id="@+id/button2" android:text="广播意图" android:onClick="broadcastIntent" android:layout_below="@+id/imageButton" android:layout_centerHorizontal="true" /> RelativeLayout>
res/values/strings.xml The contents of the file define two new constants.
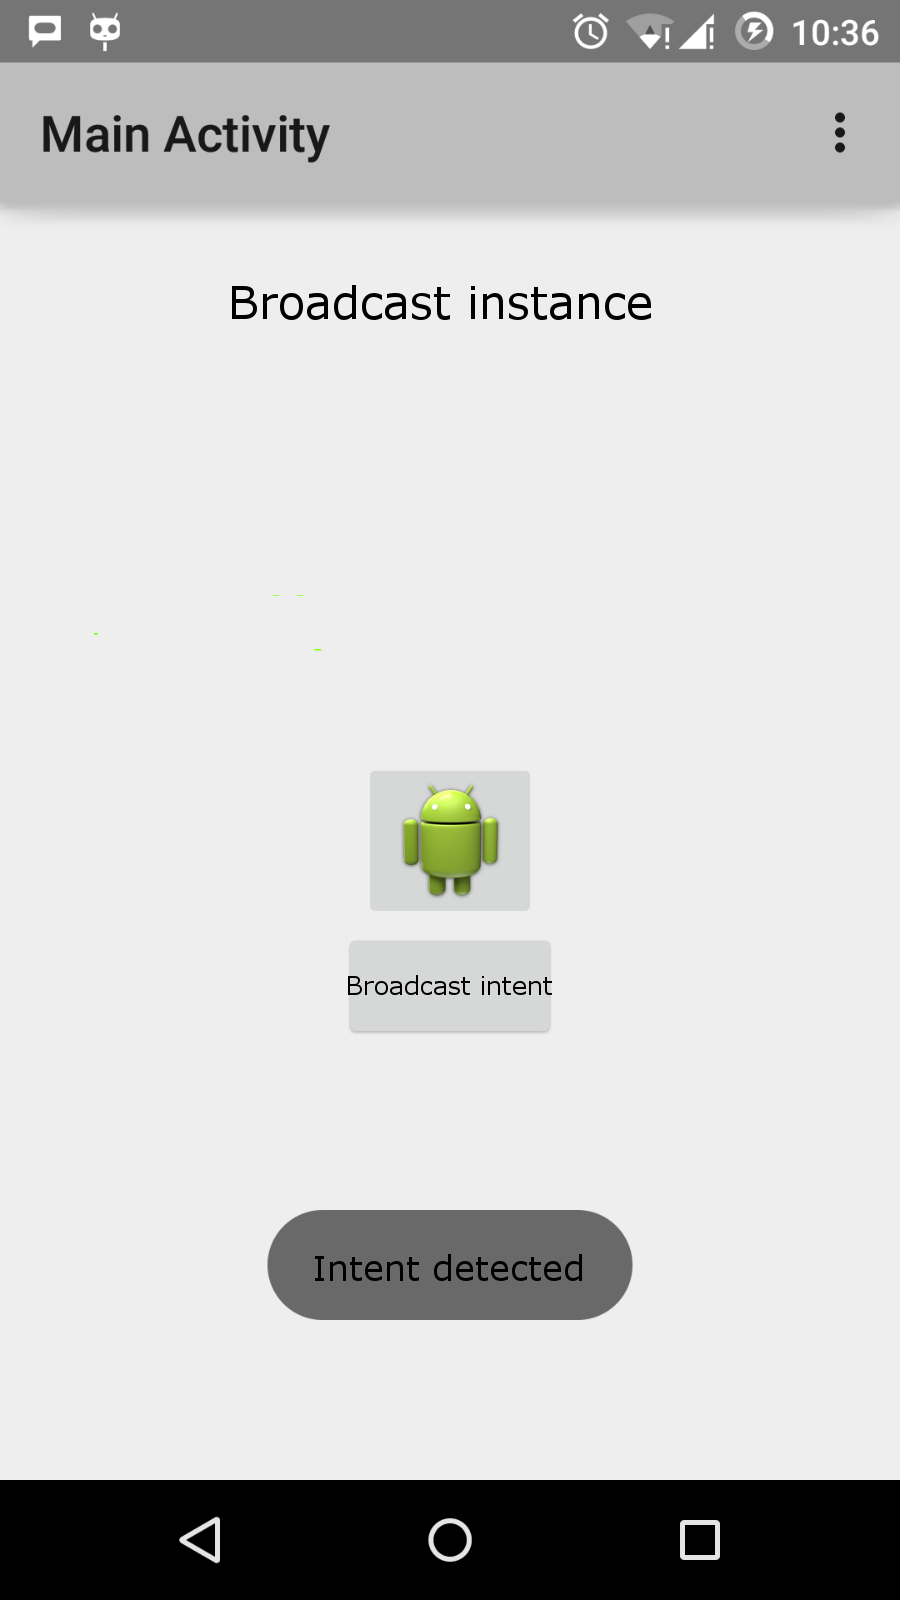
MyReceiver Intercept and execute the logic we implemented in the. The bottom of the simulator will appear toast . As follows: