最近几年来,地理信息系统无论是在理论上还是应用上都处在一个飞速发展的阶段。 GIS被应用于多个领域的建模和决策支持,如城市管理、区划、环境整治等等,地理信息成为信息时代重要的组成部分之一; “数字地球”概念的提出,更进一步推动了作为其技术支撑的GIS的发展。 与此同时,一些学者致力于相关的理论研究,如空间感知、空间数据误差、空间关系的形式化等等。 这恰好说明了地理信息系统作为应用技术和学科的两个方面,并且这两个方面构成了相互促进的发展过程。
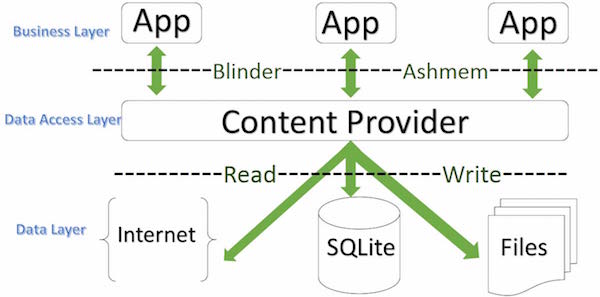
内容提供者组件通过请求从一个应用程序向其他的应用程序提供数据。这些请求由类 ContentResolver 的方法来处理。内容提供者可以使用不同的方式来存储数据。 数据可以被存放在数据库,文件,甚至是网络。
Sometimes you need to share data between applications. At this point, content providers become very useful.
内容提供者可以让内容集中,必要时可以有多个不同的应用程序来访问。 内容提供者的行为和数据库很像。你可以查询,编辑它的内容,使用 insert() , update() , delete() 和 query() 来添加或者删除内容。多数情况下数据被存储在 SQLite 数据库。
内容提供者被实现为类 ContentProvider 类的子类。需要实现一系列标准的 API,以便其他的应用程序来执行事务。
public class MyApplication extends ContentProvider { } 3.13.1. Content URI 
To query the content provider, you need to specify the query string in the form of URI in the following format:
<prefix>://<authority>/<data_type>/<id> The following are specific descriptions of the various parts of the URI:
Part | Description |
|---|---|
| Prefix: always set to content:// |
| 授权:指定内容提供者的名称,例如联系人,浏览器等。第三方的内容提供者可以是全名,如:cn.programmer.statusprovider |
| Data type: this indicates the type of data in this particular content provider. For example, if you want to get all the address books through the content provider Contacts, and the data path is people, then the URI will be like this: content://contacts/people |
| This specifies a specific request record. For example, if you look up a contact in the content provider Contacts with an ID number of 5, the URI looks like this: content://contacts/people/5 |
3.13.2. Create a content provider 
The simple steps for creating your own content provider are described here.
首先,你需要继承类
ContentProviderbase来创建一个内容提供者类。Second, you need to define the URI address of your content provider to access the content.
接下来,你需要创建数据库来保存内容。通常,Android 使用 SQLite 数据库,并在框架中重写
onCreate()方法来使用SQLiteOpenHelper的方法创建或者打开提供者的数据库。当你的应用程序被启动,它的每个内容提供者的onCreate()方法将在应用程序主线程中被调用。最后,使用
标签在 AndroidManifest.xml中注册内容提供者。以下是让你的内容提供者正常工作,你需要在类
ContentProvider中重写的一些方法: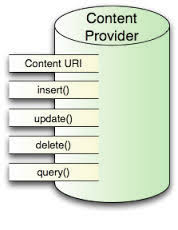
onCreate():当提供者被启动时调用。query():该方法从客户端接受请求。结果是返回指针(Cursor)对象。insert():该方法向内容提供者插入新的记录。delete():该方法从内容提供者中删除已存在的记录。update():该方法更新内容提供者中已存在的记录。getType():该方法为给定的URI返回元数据类型。
3.13.3. Example 
This example explains how to create your own content provider. Let’s follow these steps:
Steps
Description
1
Use Android Studio to create an Android application and name it Content Provider, under the package com.runoob.contentprovider, and create an empty activity.
2
Modify the main active file MainActivity.java to add two new methods onClickAddName () and onClickRetrieveStudents ().
3
Create a new Java file StudentsProvider.java under the package com.runoob.contentprovider to define the actual provider and associate the method.
4
Use the < provider…/ > tag to register the content provider in AndroidManifest.xml.
5
Modify the default contents of the res/layout/activity_main.xml file to include a simple interface for adding student records.
6
There is no need to modify the strings.xml,Android Studio to pay attention to the strings.xml file.
7
Start the Android emulator to run the application and verify the results of the application’s changes.
下面是修改的主要活动文件
src/com.runoob.contentprovider/MainActivity.java的内容。该文件包含每个基础的生命周期方法。我们添加了两个新的方法,onClickAddName()和onClickRetrieveStudents()来让应用程序处理用户交互。package com.runoob.contentprovider; import android.net.Uri; import android.os.Bundle; import android.app.Activity; import android.content.ContentValues; import android.content.CursorLoader; import android.database.Cursor; import android.view.Menu; import android.view.View; import android.widget.EditText; import android.widget.Toast; import com.runoob.contentprovider.R; public class MainActivity extends Activity { @Override protected void onCreate(Bundle savedInstanceState) { super.onCreate(savedInstanceState); setContentView(R.layout.activity_main); } @Override public boolean onCreateOptionsMenu(Menu menu) { getMenuInflater().inflate(R.menu.menu_main, menu); return true; } public void onClickAddName(View view) { // Add a new student record ContentValues values = new ContentValues(); values.put(StudentsProvider.NAME, ((EditText)findViewById(R.id.editText2)).getText().toString()); values.put(StudentsProvider.GRADE, ((EditText)findViewById(R.id.editText3)).getText().toString()); Uri uri = getContentResolver().insert( StudentsProvider.CONTENT_URI, values); Toast.makeText(getBaseContext(), uri.toString(), Toast.LENGTH_LONG).show(); } public void onClickRetrieveStudents(View view) { // Retrieve student records String URL = "content://com.example.provider.College/students"; Uri students = Uri.parse(URL); Cursor c = managedQuery(students, null, null, null, "name"); if (c.moveToFirst()) { do{ Toast.makeText(this, c.getString(c.getColumnIndex(StudentsProvider._ID)) + ", " + c.getString(c.getColumnIndex( StudentsProvider.NAME)) + ", " + c.getString(c.getColumnIndex( StudentsProvider.GRADE)), Toast.LENGTH_SHORT).show(); } while (c.moveToNext()); } } }
在包
com.runoob.contentprovider下创建新的文件StudentsProvider.java。 以下是src/com.runoob.contentprovider/StudentsProvider.java的内容。package com.runoob.contentprovider; import java.util.HashMap; import android.content.ContentProvider; import android.content.ContentUris; import android.content.ContentValues; import android.content.Context; import android.content.UriMatcher; import android.database.Cursor; import android.database.SQLException; import android.database.sqlite.SQLiteDatabase; import android.database.sqlite.SQLiteOpenHelper; import android.database.sqlite.SQLiteQueryBuilder; import android.net.Uri; import android.text.TextUtils; public class StudentsProvider extends ContentProvider { static final String PROVIDER_NAME = "com.example.provider.College"; static final String URL = "content://" + PROVIDER_NAME + "/students"; static final Uri CONTENT_URI = Uri.parse(URL); static final String _ID = "_id"; static final String NAME = "name"; static final String GRADE = "grade"; private static HashMapSTUDENTS_PROJECTION_MAP; static final int STUDENTS = 1; static final int STUDENT_ID = 2; static final UriMatcher uriMatcher; static{ uriMatcher = new UriMatcher(UriMatcher.NO_MATCH); uriMatcher.addURI(PROVIDER_NAME, "students", STUDENTS); uriMatcher.addURI(PROVIDER_NAME, "students/#", STUDENT_ID); } /** * 数据库特定常量声明 */ private SQLiteDatabase db; static final String DATABASE_NAME = "College"; static final String STUDENTS_TABLE_NAME = "students"; static final int DATABASE_VERSION = 1; static final String CREATE_DB_TABLE = " CREATE TABLE " + STUDENTS_TABLE_NAME + " (_id INTEGER PRIMARY KEY AUTOINCREMENT, " + " name TEXT NOT NULL, " + " grade TEXT NOT NULL);"; /** * 创建和管理提供者内部数据源的帮助类. */ private static class DatabaseHelper extends SQLiteOpenHelper { DatabaseHelper(Context context){ super(context, DATABASE_NAME, null, DATABASE_VERSION); } @Override public void onCreate(SQLiteDatabase db) { db.execSQL(CREATE_DB_TABLE); } @Override public void onUpgrade(SQLiteDatabase db, int oldVersion, int newVersion) { db.execSQL("DROP TABLE IF EXISTS " + STUDENTS_TABLE_NAME); onCreate(db); } } @Override public boolean onCreate() { Context context = getContext(); DatabaseHelper dbHelper = new DatabaseHelper(context); /** * 如果不存在,则创建一个可写的数据库。 */ db = dbHelper.getWritableDatabase(); return (db == null)? false:true; } @Override public Uri insert(Uri uri, ContentValues values) { /** * 添加新学生记录 */ long rowID = db.insert( STUDENTS_TABLE_NAME, "", values); /** * 如果记录添加成功 */ if (rowID > 0) { Uri _uri = ContentUris.withAppendedId(CONTENT_URI, rowID); getContext().getContentResolver().notifyChange(_uri, null); return _uri; } throw new SQLException("Failed to add a record into " + uri); } @Override public Cursor query(Uri uri, String[] projection, String selection,String[] selectionArgs, String sortOrder) { SQLiteQueryBuilder qb = new SQLiteQueryBuilder(); qb.setTables(STUDENTS_TABLE_NAME); switch (uriMatcher.match(uri)) { case STUDENTS: qb.setProjectionMap(STUDENTS_PROJECTION_MAP); break; case STUDENT_ID: qb.appendWhere( _ID + "=" + uri.getPathSegments().get(1)); break; default: throw new IllegalArgumentException("Unknown URI " + uri); } if (sortOrder == null || sortOrder == ""){ /** * 默认按照学生姓名排序 */ sortOrder = NAME; } Cursor c = qb.query(db, projection, selection, selectionArgs,null, null, sortOrder); /** * 注册内容URI变化的监听器 */ c.setNotificationUri(getContext().getContentResolver(), uri); return c; } @Override public int delete(Uri uri, String selection, String[] selectionArgs) { int count = 0; switch (uriMatcher.match(uri)){ case STUDENTS: count = db.delete(STUDENTS_TABLE_NAME, selection, selectionArgs); break; case STUDENT_ID: String id = uri.getPathSegments().get(1); count = db.delete( STUDENTS_TABLE_NAME, _ID + " = " + id + (!TextUtils.isEmpty(selection) ? " AND (" + selection + ')' : ""), selectionArgs); break; default: throw new IllegalArgumentException("Unknown URI " + uri); } getContext().getContentResolver().notifyChange(uri, null); return count; } @Override public int update(Uri uri, ContentValues values, String selection, String[] selectionArgs) { int count = 0; switch (uriMatcher.match(uri)){ case STUDENTS: count = db.update(STUDENTS_TABLE_NAME, values, selection, selectionArgs); break; case STUDENT_ID: count = db.update(STUDENTS_TABLE_NAME, values, _ID + " = " + uri.getPathSegments().get(1) + (!TextUtils.isEmpty(selection) ? " AND (" +selection + ')' : ""), selectionArgs); break; default: throw new IllegalArgumentException("Unknown URI " + uri ); } getContext().getContentResolver().notifyChange(uri, null); return count; } @Override public String getType(Uri uri) { switch (uriMatcher.match(uri)){ /** * 获取所有学生记录 */ case STUDENTS: return "vnd.android.cursor.dir/vnd.example.students"; /** * 获取一个特定的学生 */ case STUDENT_ID: return "vnd.android.cursor.item/vnd.example.students"; default: throw new IllegalArgumentException("Unsupported URI: " + uri); } } } 以下是修改后的
AndroidManifest.xml文件。 这里添加了标签来包含我们的内容提供者: 下面是
res/layout/activity_main.xml文件的内容:<RelativeLayout xmlns:android="http://schemas.android.com/apk/res/android" xmlns:tools="http://schemas.android.com/tools" android:layout_width="match_parent" android:layout_height="match_parent" android:paddingLeft="@dimen/activity_horizontal_margin" android:paddingRight="@dimen/activity_horizontal_margin" android:paddingTop="@dimen/activity_vertical_margin" android:paddingBottom="@dimen/activity_vertical_margin" tools:context=".MainActivity"> <TextView android:id="@+id/textView1" android:layout_width="wrap_content" android:layout_height="wrap_content" android:text="内容提供者实例" android:layout_alignParentTop="true" android:layout_centerHorizontal="true" android:textSize="30dp" /> <TextView android:id="@+id/textView2" android:layout_width="wrap_content" android:layout_height="wrap_content" android:text="www.runoob.com" android:textColor="#ff87ff09" android:textSize="30dp" android:layout_below="@+id/textView1" android:layout_centerHorizontal="true" /> <ImageButton android:layout_width="wrap_content" android:layout_height="wrap_content" android:id="@+id/imageButton" android:src="@drawable/ic_launcher" android:layout_below="@+id/textView2" android:layout_centerHorizontal="true" /> <Button android:layout_width="wrap_content" android:layout_height="wrap_content" android:id="@+id/button2" android:text="添加" android:layout_below="@+id/editText3" android:layout_alignRight="@+id/textView2" android:layout_alignEnd="@+id/textView2" android:layout_alignLeft="@+id/textView2" android:layout_alignStart="@+id/textView2" android:onClick="onClickAddName"/> <EditText android:layout_width="wrap_content" android:layout_height="wrap_content" android:id="@+id/editText" android:layout_below="@+id/imageButton" android:layout_alignRight="@+id/imageButton" android:layout_alignEnd="@+id/imageButton" /> <EditText android:layout_width="wrap_content" android:layout_height="wrap_content" android:id="@+id/editText2" android:layout_alignTop="@+id/editText" android:layout_alignLeft="@+id/textView1" android:layout_alignStart="@+id/textView1" android:layout_alignRight="@+id/textView1" android:layout_alignEnd="@+id/textView1" android:hint="姓名" android:textColorHint="@android:color/holo_blue_light" /> <EditText android:layout_width="wrap_content" android:layout_height="wrap_content" android:id="@+id/editText3" android:layout_below="@+id/editText" android:layout_alignLeft="@+id/editText2" android:layout_alignStart="@+id/editText2" android:layout_alignRight="@+id/editText2" android:layout_alignEnd="@+id/editText2" android:hint="年级" android:textColorHint="@android:color/holo_blue_bright" /> <Button android:layout_width="wrap_content" android:layout_height="wrap_content" android:text="查询" android:id="@+id/button" android:layout_below="@+id/button2" android:layout_alignRight="@+id/editText3" android:layout_alignEnd="@+id/editText3" android:layout_alignLeft="@+id/button2" android:layout_alignStart="@+id/button2" android:onClick="onClickRetrieveStudents"/> RelativeLayout>
确保
res/values/strings.xml文件中有以下内容:Content Provider Settings Let’s run the Content Provider application that we just modified. I assume that you have created AVD when you installed the environment. Open the active file in your project and click the icon in the toolbar to run the application in Android Studio. Android Studio installs the application on AVD and starts it. If all goes well, it will be displayed on the simulator window as follows:
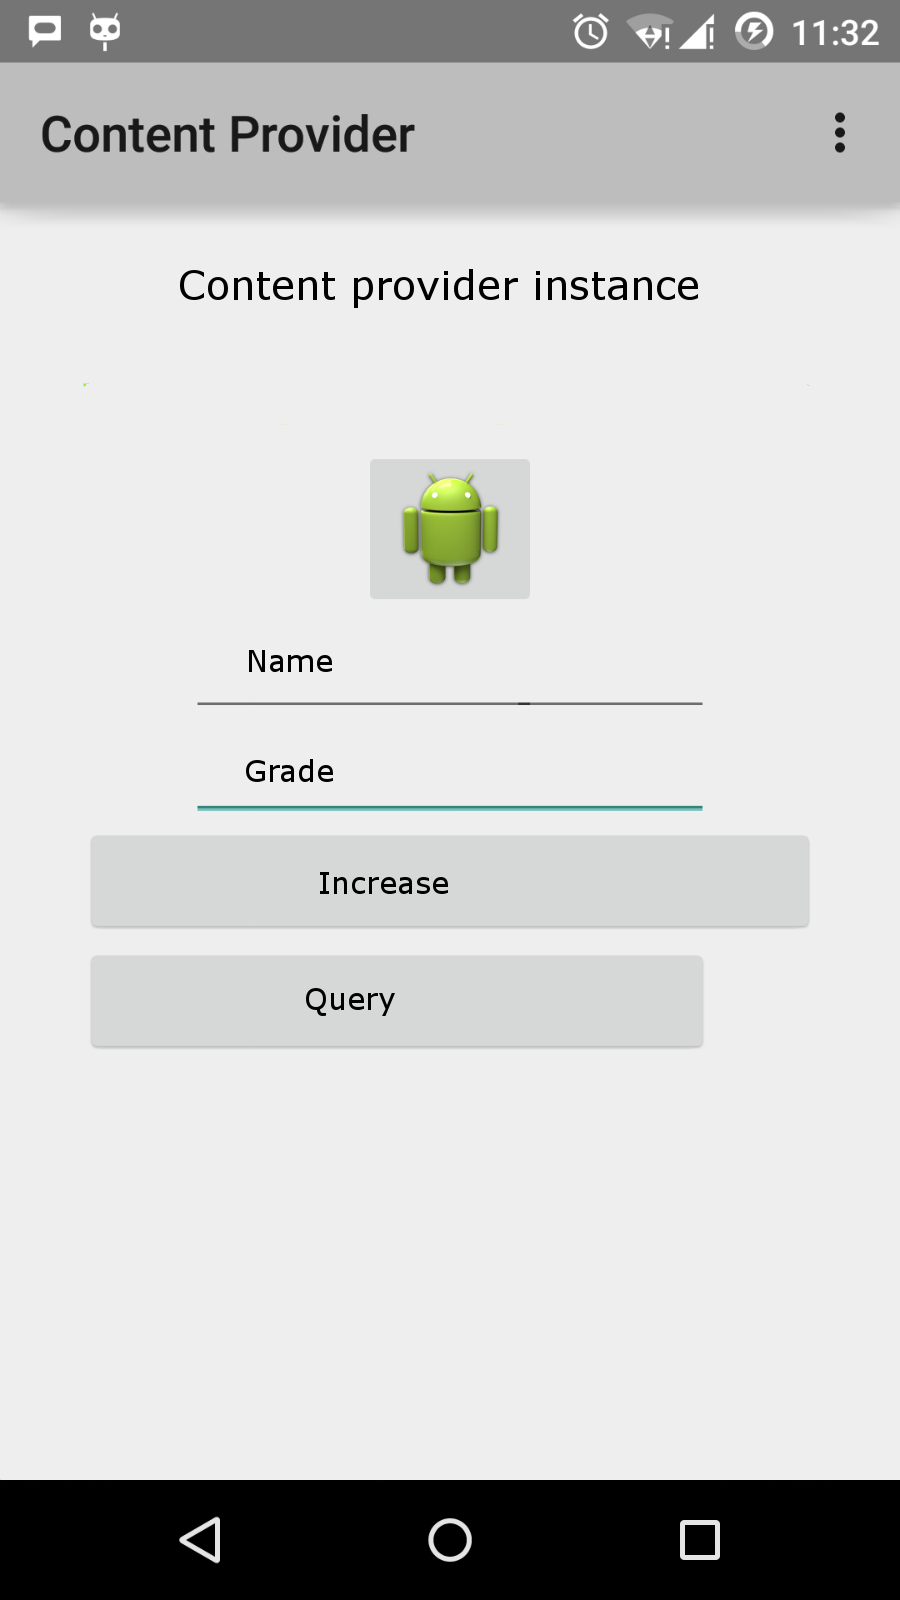
输入姓名和年级,并点击”添加”按钮,这将在数据中添加一条学生记录, 并在底部删除一条信息。信息内容显示包含添加进数据库的记录数的内容提供者URI。 这个操作使用了
insert()方法。重复这个过程在我们的内容提供者的数据库中添加更多的学生。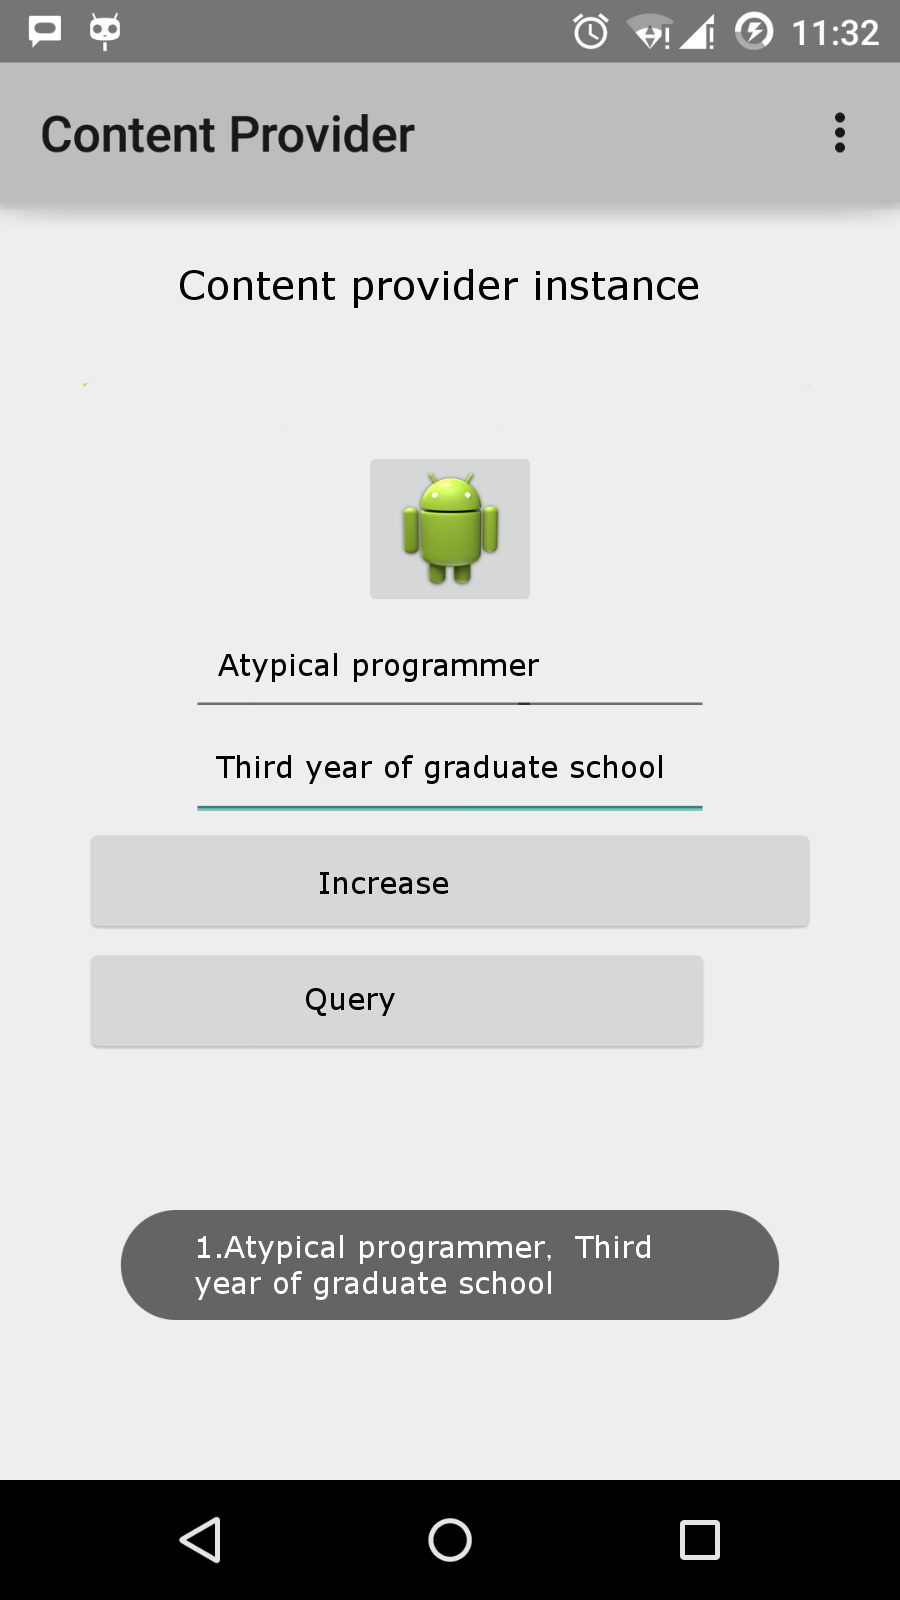
一旦你完成数据库记录的添加,是时候向内容提供者要求给回这些记录。 点击”查询”按钮,这将通过实现的
query()方法来获取并显示所有的数据记录。你可以在
MainActivity.java中提供回调方法,来编写更新和删除的操作,并修改用户界面来添加更新和删除操作。你可以通过这种方式使用已有的内容提供者,如通讯录。 你也可以通过这种方式来开发一个优秀的面向数据库的应用, 你可以像上面介绍的实例那样来执行素有的数据库操作,如读、写、更新和删除。
- 1. Angularjs2 8
- 1. SVG tutorial 19
- 1. Memcached 20
- 1. C# tutorial 61
- 1. Sqlite 47
- 2. Go 43
- 2. Docker 59
- 2. Vue3 19
- 2. Servlet 21
- 3. React 23
- 3. SOAP tutorial 10
- 3. Android 18
- 3.2. Overview of Android
- 3.17. Android fragment transition
- 3.11. Android Service (Service)
- 3.4. Android Studio installation
- 3.18. Android intent (Intent) and filter (Filter)
- 3.6. Android architecture
- > 3.13. Android-content provider (Content Provider)
- 3.10. Android activity (Activity)
- 3.9. Android Resource (Resources) access
- 3.12. Android broadcast receiver (Broadcast Receivers)
- 3. Mongodb 44
- 3. Kotlin 18
- 4. Lua 31
- 4. MySQL tutorial 35
- 4. Appml 12
- 5. Perl 45
- 5. Postgresql 41
- web 15
- 5. Web Services tutorial 6
- 6. Ruby 42
- 6. Design-pattern 35
- 7. Django 18
- 7. Rust 22
- 6. WSDL tutorial 8
- 8. Foundation 39
- 9. Ios 43
- 8. Css3 26
- 9. Swift 44
- 11. HTML tutorial-(HTML5 Standard) 54
- 12. Http 6
- 13. Regex 6
- 14. Regexp 8
- 1. Introduction to geographic information system 6
- 2. From the Real World to the Bit World 3
- 3. Spatial Data Model 7
- 4. 空间参照系统和 地图投影 5
- 5. Data in GIS 3
- 6. Spatial data acquisition 2
- 7. Spatial Data Management 6
- 8. Spatial analysis 8
- 9. 数字地形模型( DTM )与地形分析 5
- 10. 空间建模与 空间决策支持 6
- 11. Spatial data representation and map making 6
- 12. 3S Integration Technology 5
- 13. 网络地理信息系统 3
- 14. Examples of Geographic Information System Application 8
- 15. Organization and Management of Geographic Information System Application Projects 9
- 16. Geographic Information system Software Engineering Technology 6
- 17. Geographic Information System Standards 3
- 18. Geographic Information System and Society 3
- 19. Earth Information Science and Digital Earth 3