最近几年来,地理信息系统无论是在理论上还是应用上都处在一个飞速发展的阶段。 GIS被应用于多个领域的建模和决策支持,如城市管理、区划、环境整治等等,地理信息成为信息时代重要的组成部分之一; “数字地球”概念的提出,更进一步推动了作为其技术支撑的GIS的发展。 与此同时,一些学者致力于相关的理论研究,如空间感知、空间数据误差、空间关系的形式化等等。 这恰好说明了地理信息系统作为应用技术和学科的两个方面,并且这两个方面构成了相互促进的发展过程。
Earlier, we implemented access to services running in the docker container through network ports.
Some network applications can be run in the container, and to make them accessible externally, you can specify the port mapping with the-P or-p parameter.
Let’s implement a port connection to a docker container. We created a container for python applications. In addition, we can specify the network address of the container binding, such as binding 127.0.0.1. We use -P Bind port number, using docker ps You can see that container port 5000 is bound to host port 32768. We can also use it. -p Identity to specify that the container port is bound to the host port. The difference between the two ways is: -P : Is the internal port of the container 随机 The port mapped to the host. -p : Is the container internal port bound to the 指定 The host port of. In addition, we can specify the network address of the container binding, such as binding 127.0.0.1. In this way, we can access port 5000 of the container by accessing 127.0.0.1 virtual 5001. In the above example, the default is to bind the tcp port. If you want to bind the UDP port, you can add the /udp . docker port The command allows us to quickly view the binding of the port. Port mapping is not the only way to connect docker to another container. Docker has a connection system that allows multiple containers to be connected together to share connection information. The docker connection creates a parent-child relationship where the parent container can see the information of the child container. When we create a container, docker automatically names it. In addition, we can also use –name Identity to name the container, for example: We can use it. docker ps Command to view the container name. Let’s start by creating a new Docker network. Parameter description: -d : parameter specifies the Docker network type, including bridge and overlay. The overlay network type is used for Swarm mode, which you can ignore in this section. Run a container and connect to the new test-net network: Open a new terminal, run a container, and join the test-net network: Click on the picture to see the larger picture: ` <../wp-content/uploads/2016/05/docker-net2.png>` _ _ below use ping to prove that the test1 container and the test2 container have established an interconnection. If there is no ping command in the test1 or test2 containers, execute the following command to install ping in the container (that is, you can install it in a container, submit the container to the image, and rerun the above two containers with a new image). Enter the following command in the test1 container: Click on the picture to see the larger picture: ` <../wp-content/uploads/2016/05/docker-net3.png>` _ _ similarly, the test2 container will also successfully connect to: Click on the picture to see the larger picture: ` <../wp-content/uploads/2016/05/docker-net4.png>` In this way, an interconnection is established between the test1 container and the test2 container. If you have multiple containers that need to be connected to each other, it is recommended to use Docker Compose, which will be described later. We can set the DNS of all containers by adding the following to the / etc/docker/daemon.json file of the host: Once set, the DNS of the startup container is automatically configured to 114.114.114.114 and 8.8.8.8. After configuration, you need to restart docker to take effect. To see if the container’s DNS is valid, you can use the following command, which outputs the container’s DNS information: Click on the picture to see the larger picture: ` <../wp-content/uploads/2016/05/docker-net5.png>` __ 手动指定容器的配置 If you only want to set DNS in the specified container, you can use the following command: Parameter description: –rm Automatically clean up the file system inside the container when the container exits -h HOSTNAME 或者 –hostname=HOSTNAME Set the hostname of the container, which will be written to / etc/hostname and / etc/hosts in the container. –dns=IP_ADDRESS Add a DNS server to the container’s / etc/resolv.conf and let the container use this server to resolve all hostnames that are not in / etc/hosts. –dns-search=DOMAIN : set the container’s search domain, when setting the search field to .example.com, when searching for a host named host, DNS searches not only host, but also host.example.com. Click on the picture to see the larger picture: ` <../wp-content/uploads/2016/05/docker-net6.png>` _ _ if not specified when the container is started –dns And –dns-search Docker defaults to / etc/resolv.conf on the host host to configure the DNS of the container. 2.12.1. Network port mapping 
runoob@runoob:~$ docker run -d -P training/webapp python app.py fce072cc88cee71b1cdceb57c2821d054a4a59f67da6b416fceb5593f059fc6d
runoob@runoob:~$ docker ps CONTAINER ID IMAGE COMMAND ... PORTS NAMES fce072cc88ce training/webapp "python app.py" ... 0.0.0.0:32768->5000/tcp grave_hopper
runoob@runoob:~$ docker run -d -p 5000:5000 training/webapp python app.py 33e4523d30aaf0258915c368e66e03b49535de0ef20317d3f639d40222ba6bc0
runoob@runoob:~$ docker ps CONTAINER ID IMAGE COMMAND ... PORTS NAMES 33e4523d30aa training/webapp "python app.py" ... 0.0.0.0:5000->5000/tcp berserk_bartik fce072cc88ce training/webapp "python app.py" ... 0.0.0.0:32768->5000/tcp grave_hopper
runoob@runoob:~$ docker run -d -p 127.0.0.1:5001:5000 training/webapp python app.py 95c6ceef88ca3e71eaf303c2833fd6701d8d1b2572b5613b5a932dfdfe8a857c runoob@runoob:~$ docker ps CONTAINER ID IMAGE COMMAND ... PORTS NAMES 95c6ceef88ca training/webapp "python app.py" ... 5000/tcp, 127.0.0.1:5001->5000/tcp adoring_stonebraker 33e4523d30aa training/webapp "python app.py" ... 0.0.0.0:5000->5000/tcp berserk_bartik fce072cc88ce training/webapp "python app.py" ... 0.0.0.0:32768->5000/tcp grave_hopper
runoob@runoob:~$ docker run -d -p 127.0.0.1:5000:5000/udp training/webapp python app.py 6779686f06f6204579c1d655dd8b2b31e8e809b245a97b2d3a8e35abe9dcd22a runoob@runoob:~$ docker ps CONTAINER ID IMAGE COMMAND ... PORTS NAMES 6779686f06f6 training/webapp "python app.py" ... 5000/tcp, 127.0.0.1:5000->5000/udp drunk_visvesvaraya 95c6ceef88ca training/webapp "python app.py" ... 5000/tcp, 127.0.0.1:5001->5000/tcp adoring_stonebraker 33e4523d30aa training/webapp "python app.py" ... 0.0.0.0:5000->5000/tcp berserk_bartik fce072cc88ce training/webapp "python app.py" ... 0.0.0.0:32768->5000/tcp grave_hopper
runoob@runoob:~$ docker port adoring_stonebraker 5000 127.0.0.1:5001
2.12.2. Interconnection of Docker containers 
2.12.3. Container naming 
runoob@runoob:~$ docker run -d -P --name runoob training/webapp python app.py 43780a6eabaaf14e590b6e849235c75f3012995403f97749775e38436db9a441
runoob@runoob:~$ docker ps -l CONTAINER ID IMAGE COMMAND ... PORTS NAMES 43780a6eabaa training/webapp "python app.py" ... 0.0.0.0:32769->5000/tcp runoob
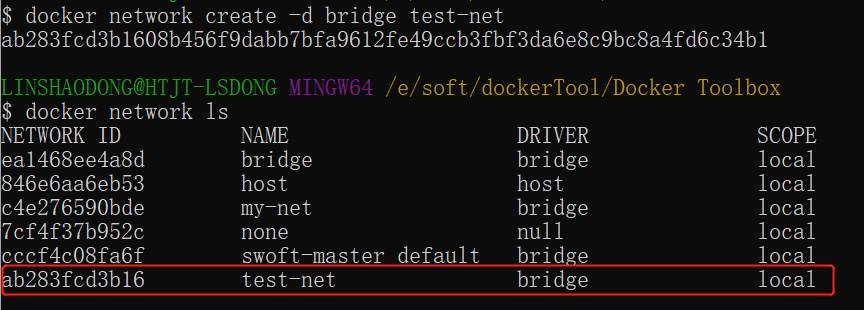
Create a new network 
$ docker network create -d bridge test-net
Connect the container 
$ docker run -itd --name test1 --network test-net ubuntu /bin/bash
$ docker run -itd --name test2 --network test-net ubuntu /bin/bash
apt-get update apt install iputils-ping
2.12.4. Configure DNS 
{ "dns" : [ "114.114.114.114", "8.8.8.8" ] }
$ docker run -it --rm ubuntu cat etc/resolv.conf
$ docker run -it --rm -h host_ubuntu --dns=114.114.114.114 --dns-search=test.com ubuntu