最近几年来,地理信息系统无论是在理论上还是应用上都处在一个飞速发展的阶段。 GIS被应用于多个领域的建模和决策支持,如城市管理、区划、环境整治等等,地理信息成为信息时代重要的组成部分之一; “数字地球”概念的提出,更进一步推动了作为其技术支撑的GIS的发展。 与此同时,一些学者致力于相关的理论研究,如空间感知、空间数据误差、空间关系的形式化等等。 这恰好说明了地理信息系统作为应用技术和学科的两个方面,并且这两个方面构成了相互促进的发展过程。
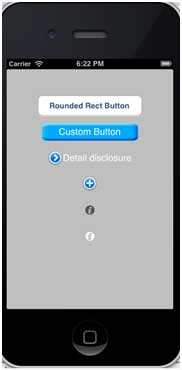
Buttons are used to handle user actions. It intercepts the touch event and sends the message to the target object. You can change the xib button properties in the property inspector of the Utility area (utility area, right side of the window). Button Typ UIButtonTypeCustom UIButtonTypeRoundedRect UIButtonTypeDetailDisclosure UIButtonTypeInfoLight UIButtonTypeInfoDark UIButtonTypeContactAdd Important attribute ImageView TitleLabel An important method Add a custom method addDifferentTypesOfButton 我们将命名为”Button_Default.png”和”Button_Highlighted.png”的个图像添加到我们的项目,可以通过将图像拖到列出了我们的项目文件的导航区域来完成。 Update viewDidLoad in ViewController.m, as shown below Now when we run the application, we get the following output: 9.11.1. Rounded rectangle button 

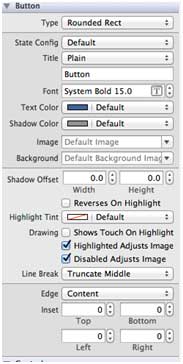
9.11.2. Button properties in xib 
+ (id)buttonWithType:(UIButtonType)buttonType
- (UIImage *)backgroundImageForState:(UIControlState)state
- (UIImage *)imageForState:(UIControlState)state
- (void)setTitle:(NSString *)title forState:(UIControlState)state
- (void)addTarget:(id)target action:(SEL)action forControlEvents: (UIControlEvents) controlEvents
-(void)addDifferentTypesOfButton { // A rounded Rect button created by using class method UIButton *roundRectButton = [UIButton buttonWithType: UIButtonTypeRoundedRect]; [roundRectButton setFrame:CGRectMake(60, 50, 200, 40)]; // sets title for the button [roundRectButton setTitle:@"Rounded Rect Button" forState: UIControlStateNormal]; [self.view addSubview:roundRectButton]; UIButton *customButton = [UIButton buttonWithType: UIButtonTypeCustom]; [customButton setBackgroundColor: [UIColor lightGrayColor]]; [customButton setTitleColor:[UIColor blackColor] forState: UIControlStateHighlighted]; //sets background image for normal state [customButton setBackgroundImage:[UIImage imageNamed: @"Button_Default.png"] forState:UIControlStateNormal]; //sets background image for highlighted state [customButton setBackgroundImage:[UIImage imageNamed: @"Button_Highlighted.png"] forState:UIControlStateHighlighted]; [customButton setFrame:CGRectMake(60, 100, 200, 40)]; [customButton setTitle:@"Custom Button" forState:UIControlStateNormal]; [self.view addSubview:customButton]; UIButton *detailDisclosureButton = [UIButton buttonWithType: UIButtonTypeDetailDisclosure]; [detailDisclosureButton setFrame:CGRectMake(60, 150, 200, 40)]; [detailDisclosureButton setTitle:@"Detail disclosure" forState: UIControlStateNormal]; [self.view addSubview:detailDisclosureButton]; UIButton *contactButton = [UIButton buttonWithType: UIButtonTypeContactAdd]; [contactButton setFrame:CGRectMake(60, 200, 200, 40)]; [self.view addSubview:contactButton]; UIButton *infoDarkButton = [UIButton buttonWithType: UIButtonTypeInfoDark]; [infoDarkButton setFrame:CGRectMake(60, 250, 200, 40)]; [self.view addSubview:infoDarkButton]; UIButton *infoLightButton = [UIButton buttonWithType: UIButtonTypeInfoLight]; [infoLightButton setFrame:CGRectMake(60, 300, 200, 40)]; [self.view addSubview:infoLightButton]; }
9.11.3. Note: 
(void)viewDidLoad { [super viewDidLoad]; //The custom method to create our different types of button is called [self addDifferentTypesOfButton]; //Do any additional setup after loading the view, typically from a nib }
9.11.4. Output 