最近几年来,地理信息系统无论是在理论上还是应用上都处在一个飞速发展的阶段。 GIS被应用于多个领域的建模和决策支持,如城市管理、区划、环境整治等等,地理信息成为信息时代重要的组成部分之一; “数字地球”概念的提出,更进一步推动了作为其技术支撑的GIS的发展。 与此同时,一些学者致力于相关的理论研究,如空间感知、空间数据误差、空间关系的形式化等等。 这恰好说明了地理信息系统作为应用技术和学科的两个方面,并且这两个方面构成了相互促进的发展过程。
In this section, we will show you how to build an Angular form using components and templates.
Using Angular templates, we can create various types of forms, such as login forms, contact forms, product details forms, etc., and we also add data checks to the fields of these forms.
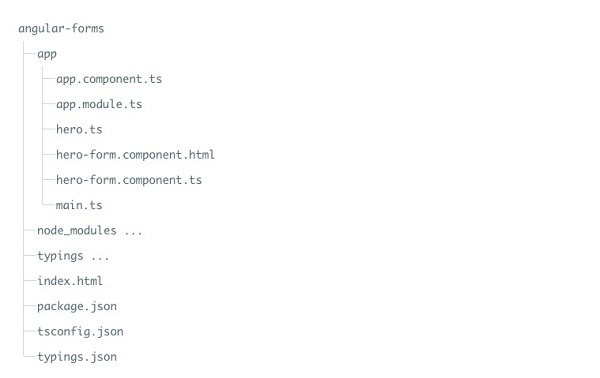
Next, let’s implement the function of the form step by step. Import initialization project. For a complete project creation, please refer to: Angular 2 TypeScript environment configuration Or download the source code directly: Click me to download After decompressing, change the directory name to angular-forms, and modify “name”: “angular-quickstart” in the angular-forms/package.json file to “name”: “angular-forms”. When it is finished, we execute A simple model class named In In the following code, labeled Each Angular form is divided into two parts: a HTML-based template and a code-based component that handles data and user interaction. In Instance is imported into the Modify Because template-driven forms have their own modules, we have to put The Modify the root component file Create a template file In open Execution Next, we use the Modify Every last Every last The output result of running the above instance is as follows: We can also pass through Status Class when it is true Class when it is false Control has already been accessed Ng-touched Ng-untouched The control value has changed Ng-dirty Ng-pristine The control value is valid Ng-valid Ng-invalid This allows us to add a custom CSS to reflect the state of the form. In open Modify In the template by setting the Delete Next, we create a form for adding a website, in the Bind the above button event to the component method: Let’s add one to the component We can use Angular’s instructions. We define a template reference variable This The The In the template, we put The main form is visible from the beginning because The final directory structure is: 1.7.1. Create a project 
cnpm install to load the dependency package. 1.7.2. Create a Site model 
Site has been created, which includes three required fields: id , name , and url . One optional field is alexa . angular-forms/app create under the directory site.ts file, the code is as follows: app/site.ts file: ¶ export class Site { constructor( public id: number, public name: string, public url: string, public alexa?: number ) { } } public is a public field alexa , thenadd a question mark (?) Represents an optional field. 1.7.3. Create a form component 
angular-forms/app create under the directory site-form.component.ts file, the code is as follows: app/site-form.component.ts file: ¶ import { Component } from '@angular/core'; import { Site } from './site'; @Component({ moduleId: module.id, selector: 'site-form', templateUrl: 'site-form.component.html' }) export class SiteFormComponent { urls = ['www.runoob.com', 'www.google.com', 'www.taobao.com', 'www.facebook.com']; model = new Site(1, 'Rookie Tutorial', this.urls[0], 10000); submitted = false; onSubmit() { this.submitted = true; } // TODO: Remove after completion get diagnostic() { return JSON.stringify(this.model); } }
Component decorator and Site model. @Component selector “site-form” indicates that we can pass through a templateUrl property points to a separate HTML template file called site-form.component.html . diagnostic property is used to return the JSON form of the model. 1.7.4. Define the root module of the application 
app.module.ts to define the root module of the application, the module specifies the external referenced and declared components that belongto this module, such as SiteFormComponent . FormsModule added to this application imports array so that we can use the form. app/app.module.ts file code is as follows app/app.module.ts file: ¶ import { NgModule } from '@angular/core'; import { BrowserModule } from '@angular/platform-browser'; import { FormsModule } from '@angular/forms'; import { AppComponent } from './app.component'; import { SiteFormComponent } from './site-form.component'; @NgModule({ imports: [ BrowserModule, FormsModule ], declarations: [ AppComponent, SiteFormComponent ], bootstrap: [ AppComponent ] }) export class AppModule { }
1.7.5. Create a root component 
app.component.ts , set the SiteFormComponent put it in it. app/app.component.ts file: ¶ import { Component } from '@angular/core'; @Component({ selector: 'my-app', template: '
1.7.6. Create an initial HTML form template 
site-form.component.html the code is as follows: app/site-form.component.html file: ¶ <div class="container"> <h1>Website Formsh1> <form> <div class="form-group"> <label for="name">Website Namelabel> <input type="text" class="form-control" id="name" required> div> <div class="form-group"> <label for="alexa">alexa rankinglabel> <input type="text" class="form-control" id="alexa"> div> <button type="submit" class="btn btn-default">submit tobutton> form> div>
required property is a required field, or optional if it is not set. angular-forms enter the following command in the directory: cnpm install bootstrap --save
index.html file, add the following style links to the : <linkrel="stylesheet"href="node_modules/bootstrap/dist/css/bootstrap.min.css">
npm start visit: http://localhost:3000/ , and the output effect is as follows: 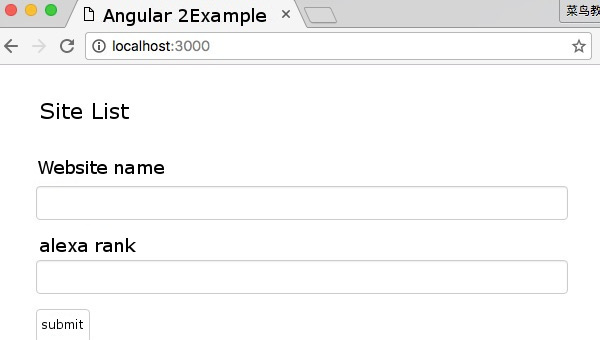
1.7.7. Use
ngModel perform two-way data binding ¶ ngModel perform two-way data binding to update the properties of the component by listening for DOM events. app/site-form.component.html , using the ngModel bind our form to the model. The code is as follows:
app/site-form.component.html file: ¶ <div class="container"> <h1>Website Formsh1> <form> {{diagnostic}} <div class="form-group"> <label for="name">Website Namelabel> <input type="text" class="form-control" id="name" required [(ngModel)]="model.name" name="name"> div> <div class="form-group"> <label for="alexa">alexa rankinglabel> <input type="text" class="form-control" id="alexa" [(ngModel)]="model.alexa" name="alexa"> div> <div class="form-group"> <label for="url">website URL label> <select class="form-control" id="url" required [(ngModel)]="model.url" name="url"> <option *ngFor="let p of urls" [value]="p">{{p}}option> select> div> <button type="submit" class="btn btn-default">submit tobutton> form> div>
input every element has one. id property, which is defined by the label of the element for property is used to match the tag to the corresponding input . input every element has one. name property, which is needed by Angular’s form module to register the controller for the form. 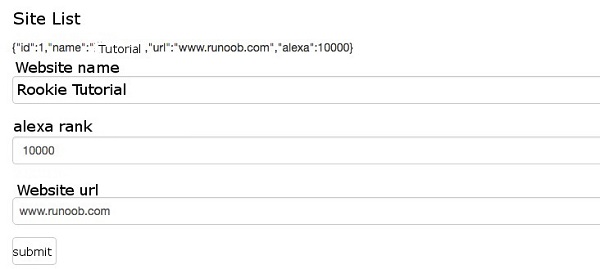
{{diagnostic}} is only used to output data during testing. ngModel tracking modification status and validation, it uses three CSS classes to update the control to reflect the current state.
angular-forms create under the directory forms.css file, the code is as follows:
forms.css file: ¶ .ng-valid[required], .ng-valid.required { border-left: 5px solid #42A948; /* green */ } .ng-invalid:not(form) { border-left: 5px solid #a94442; /* red */ }
index.html file, add the following style links to the : <linkrel="stylesheet"href="forms.css">
app/site-form.component.html code is as follows:
app/site-form.component.html file: ¶ <div class="container"> <h1>Website Formsh1> <form> {{diagnostic}} <div class="form-group"> <label for="name">Website Namelabel> <input type="text" class="form-control" id="name" required [(ngModel)]="model.name" name="name" #name="ngModel" > <div [hidden]="name.valid || name.pristine" class="alert alert-danger"> Website name is required div> div> <div class="form-group"> <label for="alexa">alexa rankinglabel> <input type="text" class="form-control" id="alexa" [(ngModel)]="model.alexa" name="alexa"> div> <div class="form-group"> <label for="url">website URL label> <select class="form-control" id="url" required [(ngModel)]="model.url" name="url"> <option *ngFor="let p of urls" [value]="p">{{p}}option> select> div> <button type="submit" class="btn btn-default">submit tobutton> form> div>
div of the element hidden property is bound to the name control, we can control the visibility of error messages in the “name” field. name field, and the display result is as follows: 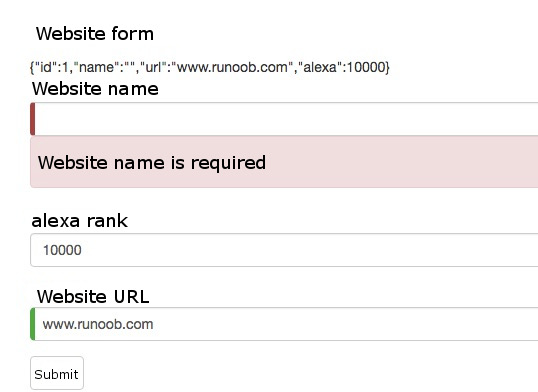
1.7.8. Add a website 
app/site-form.component.html add a button:
app/site-form.component.html file: ¶ <button type="button" class="btn btn-default" (click)="newSite()">Add a Sitebutton>
app/site-form.component.ts file: ¶ active = true; newSite() { this.model = new Site(5, '', ''); this.active = false; setTimeout(() => this.active = true, 0); }
active tag, initializing it to true . When we add a new website, it puts active tag is set to false and then through a fast setTimeout function quickly sets it back to true . 1.7.9. Pass through
ngSubmit to submit the form ¶ NgSubmit to submit the form and bind it to the SiteFormComponent.submit() in a way. <form *ngIf="active" (ngSubmit)="onSubmit()" #siteForm="ngForm">
#siteForm and initialize it to “ngForm” siteForm variable now refers to NgForm instruction, which represents the form as a whole. site-form.component.ts complete code of the file is as follows:
app/site-form.component.ts file: ¶ import { Component } from '@angular/core'; import { Site } from './site'; @Component({ moduleId: module.id, selector: 'site-form', templateUrl: 'site-form.component.html' }) export class SiteFormComponent { urls = ['www.runoob.com', 'www.google.com', 'www.taobao.com', 'www.facebook.com']; model = new Site(1, 'Rookie Tutorial', this.urls[0], 10000); submitted = false; onSubmit() { this.submitted = true; } // TODO: Remove after completion get diagnostic() { return JSON.stringify(this.model); } active = true; newSite() { this.model = new Site(5, '', ''); this.active = false; setTimeout(() => this.active = true, 0); } }
app/site-form.component.html complete code is as follows:
app/site-form.component.html file: ¶ <div class="container"> <div [hidden]="submitted"> <h1>Website Formsh1> <form *ngIf="active" (ngSubmit)="onSubmit()" #siteForm="ngForm"> {{diagnostic}} <div class="form-group"> <label for="name">Website Namelabel> <input type="text" class="form-control" id="name" required [(ngModel)]="model.name" name="name" #name="ngModel" > <div [hidden]="name.valid || name.pristine" class="alert alert-danger"> Website name is required div> div> <div class="form-group"> <label for="alexa">alexa rankinglabel> <input type="text" class="form-control" id="alexa" [(ngModel)]="model.alexa" name="alexa"> div> <div class="form-group"> <label for="url">website URL label> <select class="form-control" id="url" required [(ngModel)]="model.url" name="url"> <option *ngFor="let p of urls" [value]="p">{{p}}option> select> div> <button type="submit" class="btn btn-default" [disabled]="!siteForm.form.valid">submit tobutton> <button type="button" class="btn btn-default" (click)="newSite()">New website addedbutton> form> div> <div [hidden]="!submitted"> <h2>The information you submitted is as follows:h2> <div class="row"> <div class="col-xs-3">Website Namediv> <div class="col-xs-9 pull-left">{{ model.name }}div> div> <div class="row"> <div class="col-xs-3">Website alexa Rankingdiv> <div class="col-xs-9 pull-left">{{ model.alexa }}div> div> <div class="row"> <div class="col-xs-3">Website URL div> <div class="col-xs-9 pull-left">{{ model.url }}div> div> <br> <button class="btn btn-default" (click)="submitted=false">editbutton> div> div>
hidden property is bound to the SiteFormComponent.submitted property. submitted the property is false , when we submit this form, it is hidden submitted the property is true : submitted = false; onSubmit() { this.submitted = true; }