最近几年来,地理信息系统无论是在理论上还是应用上都处在一个飞速发展的阶段。 GIS被应用于多个领域的建模和决策支持,如城市管理、区划、环境整治等等,地理信息成为信息时代重要的组成部分之一; “数字地球”概念的提出,更进一步推动了作为其技术支撑的GIS的发展。 与此同时,一些学者致力于相关的理论研究,如空间感知、空间数据误差、空间关系的形式化等等。 这恰好说明了地理信息系统作为应用技术和学科的两个方面,并且这两个方面构成了相互促进的发展过程。
In this section, we will show you how to configure the execution environment of Angular 2.
This chapter uses JavaScript to create Angular applications, but you can also use TypeScript and Dart to create Angular applications.
The file directory structure used in this section is as follows:
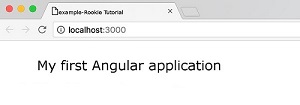
We recommend it here. Create Due to After execution, we can use the After a successful execution Components (Component) are the foundation and core of Angular applications. A component wraps a specific function, and components work together to assemble a complete application. Generally speaking, a component is a JavaScript class that controls the view template. Next, we are in And add component files Next, let’s analyze the above code: We call the global Angular through chaining Angular applications are modular, ES5 does not have a built-in modular system, we can use third-party modular systems, and then we create independent namespaces for the application We will take the overall situation Most of the application files are passed through the In this example When we want to create an application that is meaningful, we can use properties and application logic to extend the object. The Angular application consists of an Angular module, which contains the components needed by the Angular application and anything else. Next, we create Add We need two things to start the application: Angular’s The application root module AppModule mentioned above. Next, create 1.Load the JavaScript library we need 2.Load our own JavaScript files and pay attention to the order 3.We are in The execution process is as follows: when Angular is in Open the terminal and enter the following command: Visit http://localhost:3000/ , and the browser displays the result as follows: In this way, even if our first Angular2 application is created, the source code used in this article can be downloaded in the following ways, not including 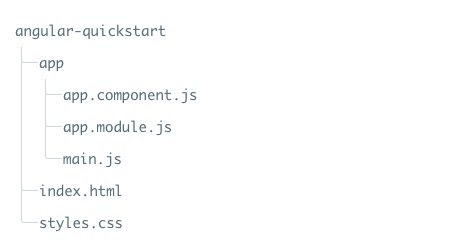
1.2.1. Create a profile 
Create a directory 
$ mkdir angular-quickstart $ cd angular-quickstart
1.2.2. Load the required libraries 
npm as a package management tool, if you do not have npm installed or do not understand npm can check out our tutorial, introduction to using NPM. package.json file, the code is as follows: package.json file:{ "name": "angular2-quickstart", "version": "1.0.0", "scripts": { "start": "npm run lite", "lite": "lite-server" }, "license": "ISC", "dependencies": { "@angular/common": "2.0.0", "@angular/compiler": "2.0.0", "@angular/core": "2.0.0", "@angular/forms": "2.0.0", "@angular/http": "2.0.0", "@angular/platform-browser": "2.0.0", "@angular/platform-browser-dynamic": "2.0.0", "@angular/router": "3.0.0", "@angular/upgrade": "2.0.0", "core-js": "^2.4.1", "reflect-metadata": "^0.1.3", "rxjs": "5.0.0-beta.12", "zone.js": "^0.6.23", "angular2-in-memory-web-api": "0.0.20", "bootstrap": "^3.3.6" }, "devDependencies": { "concurrently": "^2.0.0", "lite-server": "^2.2.0" } }
npm the domestic access to the official website image is too slow. Here I use Taobao’s npm image. Install the image as follows:$ npm install -g cnpm --registry=https://registry.npmmirror.com
cnpm command to install the module:$ cnpm install
angular-quickstart will be generated under the directory node_modules directory, which contains the modules we need for this example. 1.2.3. Create an Angular component 
angular-quickstart create a app directory:$ mkdir app $ cd app
app.component.js the contents are as follows: app.component.js file:(function(app) { app.AppComponent = ng.core.Component({ selector: 'my-app', template: '
My first Angular application
' }) .Class({ constructor: function() {} }); })(window.app || (window.app = {})); core namespace ng.core in Component and Class method creates a file named AppComponent the visual component of the. Component method accepts a configuration object that contains two properties Class method is where we implement the component itself, in the Class method, we add properties and methods to the component, whichare bound to the corresponding view and behavior. 1.2.4. Module 
app the file code can be wrapped in IIFE (execute the function expression immediately):(function(app) { })(window.app || (window.app = {}));
app the namespace object is passed into the IIFE and initialized with an empty object if it does not exist. app to add something to the namespace to output the code, we are in the app.component.js output in the file AppComponent .app.AppComponent =
1.2.5.
Class define object ¶ AppComponent class has only one empty constructor:.Class({ constructor: function() {} });
1.2.6.
Component define object ¶ ng.core.Component() tell Angular that the class definition object is an Angular component. Pass to ng.core.Component() has two fields for the configuration object of selector and template .ng.core.Component({ selector: 'my-app', template: '
My first Angular application
' }) selector when Angular encounters a my-app element, it creates and displays a AppComponent an example. template property holds the template for the component. 1.2.7. Add
NgModule ¶ app/app.module.js file, the contents are as follows: 1.2.8.
app.module.js file: ¶ (function(app) { app.AppModule = ng.core.NgModule({ imports: [ ng.platformBrowser.BrowserModule ], declarations: [ app.AppComponent ], bootstrap: [ app.AppComponent ] }) .Class({ constructor: function() {} }); })(window.app || (window.app = {}));
1.2.9. Start the application 
app/main.js file: app/main.js file: ¶ (function(app) { document.addEventListener('DOMContentLoaded', function() { ng.platformBrowserDynamic .platformBrowserDynamic() .bootstrapModule(app.AppModule); }); })(window.app || (window.app = {}));
platformBrowserDynamic().bootstrapModule function. index.html code is as follows: index.html file: 
index.html analysis. add to label main.js call in bootstrapModule function, it reads the AppModule metadata, found in the startup component AppComponent and find my-app selector, navigate to a name named my-app and then load the content between the tags 1.2.10. Add some styles 
styles.css file code is: styles.css file:h1 { color: #369; font-family: Arial, Helvetica, sans-serif; font-size: 250%; } body { margin: 2em; }
$ npm start
node_modules .