最近几年来,地理信息系统无论是在理论上还是应用上都处在一个飞速发展的阶段。 GIS被应用于多个领域的建模和决策支持,如城市管理、区划、环境整治等等,地理信息成为信息时代重要的组成部分之一; “数字地球”概念的提出,更进一步推动了作为其技术支撑的GIS的发展。 与此同时,一些学者致力于相关的理论研究,如空间感知、空间数据误差、空间关系的形式化等等。 这恰好说明了地理信息系统作为应用技术和学科的两个方面,并且这两个方面构成了相互促进的发展过程。
This chapter uses TypeScript to create Angular applications, which is also officially recommended, and the examples of this tutorial will also be written in TypeScript.
TypeScript is a free and open source programming language developed by Microsoft. It is a superset of JavaScript and extends the syntax of JavaScript.
If you don’t know anything about TypeScript, you can check the following information:
TypeScript getting started tutorial
TypeScript Chinese Handbook
Before you start, you need to make sure that you have installed npm if you haven’t installed it yet npm or don’t understand. npm can check out our tutorial, introduction to using NPM.
Due to npm the domestic access to the official website image is too slow. Here I use Taobao’s npm image. Install the image as follows:
$ npm install -g cnpm --registry=https://registry.npmmirror.com After execution, we can use the cnpm command to install the module:
$ cnpm install 1.3.1. Step 1: create and configure the project 
Create a directory 
$ mkdir angular-quickstart $ cd angular-quickstart 1.3.2. Create a profile 
The Angular project requires the following configuration files:
package.jsonrequired for the notebook projectnpmdependent package.tsconfig.jsondefines how the TypeScript compiler generates JavaScript code from the project source files.typings.jsonadditional definition files are provided for libraries thatare not recognized by the TypeScript compiler.The
systemjs.config.jsmodule loader is provided with information about where to find the application module and registers all the necessary dependency packages. It also includes packages that will be used for later examples in the documentation.
In Next, we use the After a successful execution angular-quickstart create the following files in the following code: package.json file: ¶ { "name": "angular-quickstart", "version": "1.0.0", "scripts": { "start": "tsc && concurrently \"npm run tsc:w\" \"npm run lite\" ", "lite": "lite-server", "postinstall": "typings install", "tsc": "tsc", "tsc:w": "tsc -w", "typings": "typings" }, "license": "ISC", "dependencies": { "@angular/common": "2.0.0", "@angular/compiler": "2.0.0", "@angular/core": "2.0.0", "@angular/forms": "2.0.0", "@angular/http": "2.0.0", "@angular/platform-browser": "2.0.0", "@angular/platform-browser-dynamic": "2.0.0", "@angular/router": "3.0.0", "@angular/upgrade": "2.0.0", "core-js": "^2.4.1", "reflect-metadata": "^0.1.3", "rxjs": "5.0.0-beta.12", "systemjs": "0.19.27", "zone.js": "^0.6.23", "angular2-in-memory-web-api": "0.0.20", "bootstrap": "^3.3.6" }, "devDependencies": { "concurrently": "^2.2.0", "lite-server": "^2.2.2", "typescript": "^2.3.4", "typings":"^1.3.2" } }
tsconfig.json file: ¶ { "compilerOptions": { "target": "es5", "module": "commonjs", "moduleResolution": "node", "sourceMap": true, "emitDecoratorMetadata": true, "experimentalDecorators": true, "removeComments": false, "noImplicitAny": false } }
typings.json file: ¶ { "globalDependencies": { "core-js": "registry:dt/core-js#0.0.0+20160725163759", "jasmine": "registry:dt/jasmine#2.2.0+20160621224255", "node": "registry:dt/node#6.0.0+20160909174046" } }
systemjs.config.js file: ¶ /** * System configuration for Angular samples * Adjust as necessary for your application needs. */ (function (global) { System.config({ paths: { // paths serve as alias 'npm:': 'node_modules/' }, // map tells the System loader where to look for things map: { // our app is within the app folder app: 'app', // angular bundles '@angular/core': 'npm:@angular/core/bundles/core.umd.js', '@angular/common': 'npm:@angular/common/bundles/common.umd.js', '@angular/compiler': 'npm:@angular/compiler/bundles/compiler.umd.js', '@angular/platform-browser': 'npm:@angular/platform-browser/bundles/platform-browser.umd.js', '@angular/platform-browser-dynamic': 'npm:@angular/platform-browser-dynamic/bundles/platform-browser-dynamic.umd.js', '@angular/http': 'npm:@angular/http/bundles/http.umd.js', '@angular/router': 'npm:@angular/router/bundles/router.umd.js', '@angular/forms': 'npm:@angular/forms/bundles/forms.umd.js', // other libraries 'rxjs': 'npm:rxjs', 'angular2-in-memory-web-api': 'npm:angular2-in-memory-web-api', }, // packages tells the System loader how to load when no filename and/or no extension packages: { app: { main: './main.js', defaultExtension: 'js' }, rxjs: { defaultExtension: 'js' }, 'angular2-in-memory-web-api': { main: './index.js', defaultExtension: 'js' } } }); })(this);
cnpm command to install the dependency package:$ cnpm install
angular-quickstart will be generated under the directory node_modules directory, which contains the modules we need for this example. We can take a look at the directory structure of the project: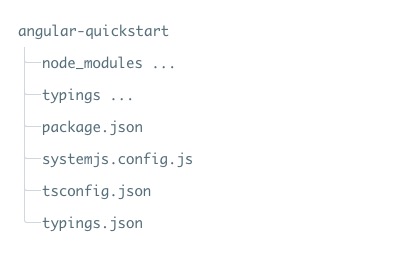
1.3.3. Step 2: create an application 
We use NgModules Angular applications are organized into functional code blocks.
Angular itself is split into some independent Angular modules, so we only need to import the required Angular parts in the application.
Each Angular application requires at least one root module (root module), which in the instance is AppModule.
Next, we are in angular-quickstart Create under the directory app table of contents:
$ mkdir app $ cd app And then in Due to app create under the directory app.module.ts file, the code is as follows: app.module.ts file: ¶ import { NgModule } from '@angular/core'; import { BrowserModule } from '@angular/platform-browser'; @NgModule({ imports: [ BrowserModule ] }) export class AppModule { }
QuickStart is a Web application running in a browser, so the root module needs to be derived from the @angular/platform-browser Import in BrowserModule and add to imports in the array.
1.3.4. Create components and add them to the application 
Each Angular application has at least one root component, which in the instance is Code parsing: The above code is derived from Next, let’s reopen it. AppComponent , app.component.ts ,the file code is as follows: app.component.ts file: ¶ import { Component } from '@angular/core'; @Component({ selector: 'my-app', template: '
My first Angular application
' }) export class AppComponent { } angular2/core introduced Component bag. @Component is an Angular 2 decorator that associates a piece of metadata to the AppComponent on the component class. my-app is a CSS selector that can be used in the HTML tag as a component. @view contains a template to tell Angular how to render the view of the component export specifies that the component can be used outside the file. app.module.ts files, importing new AppComponent and add it to the NgModule decorator’s declarations and bootstrap field: app.module.ts file: ¶ import { NgModule } from '@angular/core'; import { BrowserModule } from '@angular/platform-browser'; import { AppComponent } from './app.component'; @NgModule({ imports: [ BrowserModule ], declarations: [ AppComponent ], bootstrap: [ AppComponent ] }) export class AppModule { }
1.3.5. Part IV: start the application 
Next we need to tell Angular how to start the application.
Create it under the angular-quickstart/app directory The above code initializes the platform, allows your code to run, and then starts your main.ts file, the code is as follows: main.ts file: ¶ import { platformBrowserDynamic } from '@angular/platform-browser-dynamic'; import { AppModule } from './app.module'; const platform = platformBrowserDynamic(); platform.bootstrapModule(AppModule);
AppModule .
1.3.6. Define the host page for the application 
In Here are some noteworthy points: JavaScript Library: angular-quickstart create under the directory index.html file, the code is as follows: index.html file: 
core-js is a filled library for older browsers. zone.js and reflect-metadata Libraries are required by Angular, while SystemJS the library is used for module loading. SystemJS configuration files and scripts that can be imported and run as we just did in the main is written in the file. app module.